KubeSphere+PorterLB: Implement Grayscale Release on Bare-Metal Kubernetes
PorterLB is a load balancer implementation designed for bare-metal Kubernetes clusters. As a sub-project of KubeSphere, PorterLB fits well into the KubeSphere ecosystem. You can seamlessly integrate PorterLB as a plugin with KubeSphere to utilize the abundant features of the KubeSphere ecosystem.
During new feature release, the KubeSphere grayscale release feature allows users to freely distribute traffic among a stable version and a beta version of an application to both ensure service continuity and test the beta version before formally rolling it out.
In this article, I am going to introduce how to use KubeSphere and PorterLB to implement grayscale release for an application in a bare-metal Kubernetes cluster. To make you quickly understand how it works, I am going to directly use demonstration settings without digging too much into the details. You can obtain detailed guidance from the KubeSphere documentation and PorterLB documentation.
Architecture
-
Grayscale release
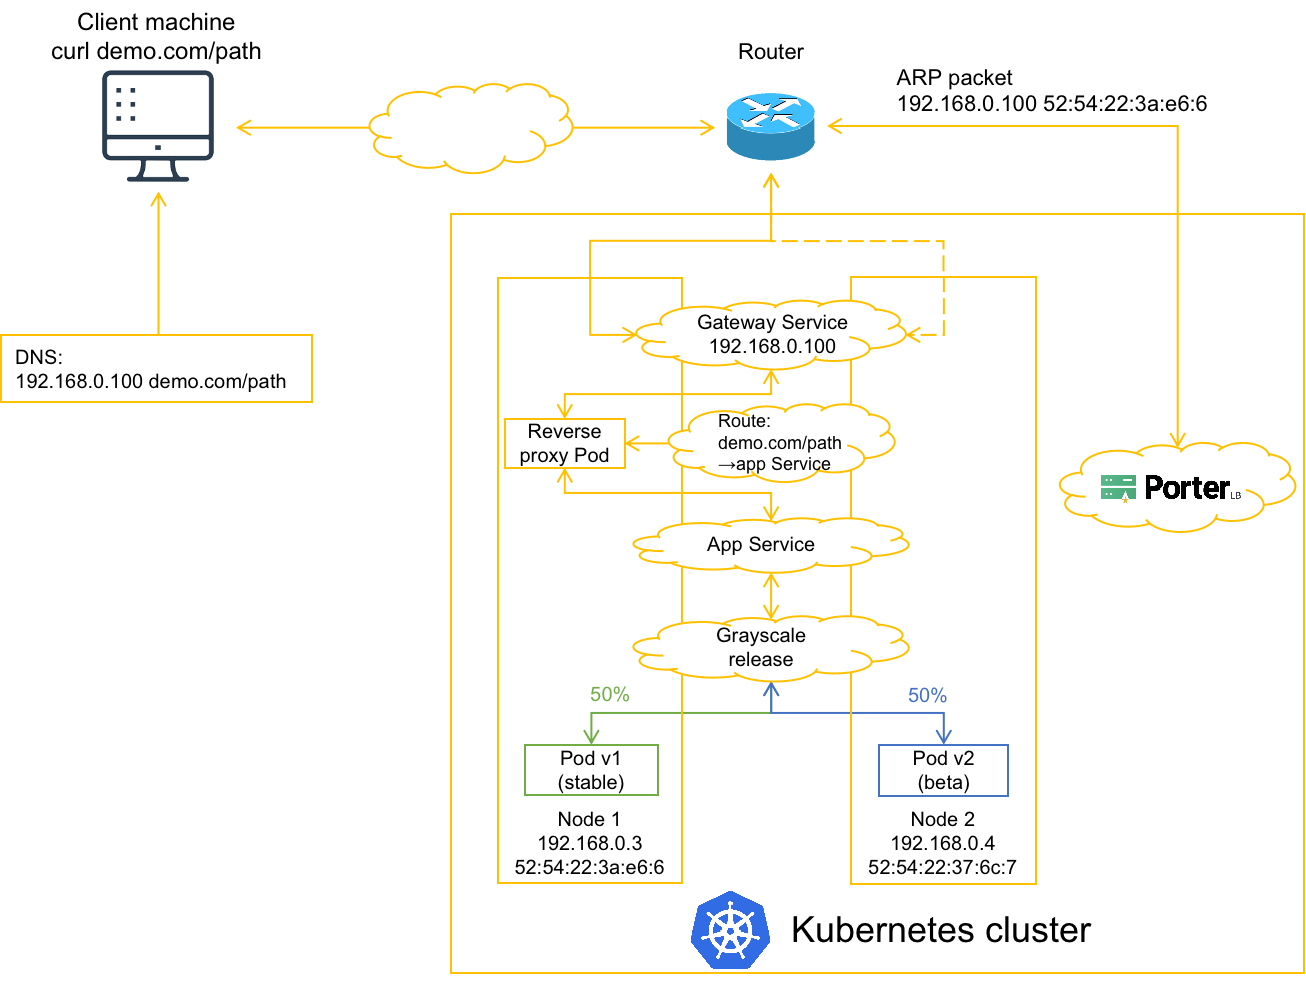
In the preceding figure, an application Service backed by Pod v1 (stable version) is deployed in a Kubernetes cluster. After grayscale release is configured on KubeSphere, Pod v2 (beta version) is created and users can determine how much traffic is forwarded to Pod v1 and how much to Pod v2. After Pod v2 is fully tested, Pod v1 can be taken offline and Pod v2 will take over all traffic.
-
KubeSphere gateway
The application Service is exposed to the outside by using the KubeSphere gateway, which is in effect a Service backed by a Pod that functions as a reverse proxy. An external client uses a path of a domain name to access the application Service. The reverse proxy Pod obtains the mapping between the path and the application Service from a Route object.
-
PorterLB
PorterLB installed in the Kubernetes cluster sends an ARP packet to the router, and tells the router to forward traffic destined for the gateway Service to node 1. If node 1 fails, the traffic will be forwarded to node 2.
Procedure
Prerequisites
- You need to prepare a Kubernetes cluster, and install KubeSphere and PorterLB in the Kubernetes cluster.
- On KubeSphere, you need to create a project and an account. The role of the account in the project must be
project-admin.
Operations
Step 1: Set the KubeSphere gateway to use PorterLB and create an Eip object.
-
Log in to KubeSphere and go to your project.
-
Choose Project Settings > Advanced Settings on the left navigation bar and click Set Gateway on the right.
-
Click LoadBalancer, set Application Governance to On, add the following annotations, and click Save. The annotations set the KubeSphere gateway Service to use PorterLB in Layer 2 mode.
lb.kubesphere.io/v1alpha1: porter protocol.porter.kubesphere.io/v1alpha1: layer2 eip.porter.kubesphere.io/v1alpha2: porter-layer2-eip # Name of the Eip object. -
Move the cursor to
 in the lower-right corner and click Kubectl to open the CLI.
 -
Run the
vi porter-layer2-eip.yamlcommand to create a YAML file for an Eip object and add the following information to the YAML file:apiVersion: network.kubesphere.io/v1alpha2 kind: Eip metadata: name: porter-layer2-eip spec: # Use an unoccupied address on the same network segment as your K8s cluster. address: 192.168.0.100 interface: eth0 protocol: layer2 -
Run the
kubectl apply -f eip.yamlcommand to create the Eip object, which functions as an IP address pool for PorterLB.
Step 2: Create an application.
- Choose Application Workloads on the left navigation bar and click Create Composing Application on the right.
- Set Application Name to demo-app, Application Version(Optional) to v1, Application Governance to On, and click Next.
- Click Add Service, click Stateless Service, set Name to
demo-svc, and click Next. - Click Add Container Image, set Image to
luksa/kubia, Container Port to8080, Service Port to80, click √, and click Next. - Click Next on the Mount Volumes tab, click Add on the Advanced Settings tab, and click Next.
- Click Add Route Rule, click Specify Domain, set HostName to
demo.com, Paths to/path | demo-svc | 80, and click OK. - Click Create.
Step 3: Configure grayscale release.
- Choose Grayscale Release on the left navigation bar, move the cursor to Canary Release, and click Create Job.
- Set Release Job Name to
demo-canaryand click Next. - Select
demo-appfrom the drop-down list, click Select on the right of demo-svc, and click Next. - Set Grayscale Release Version Number to
v2and click Next. - Click Create on the Policy Config tab.
Step 4: Test grayscale release.
-
Choose Grayscale Release on the left navigation bar, click the Job Status tab, and click demo-canary on the right.
-
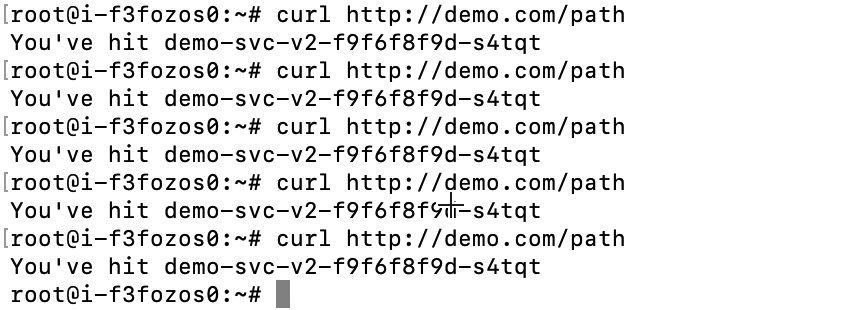
In the Real-time traffic distribution area, move the slider so that 100% traffic is sent to v2.
-
Log in to a client machine connected to the gateway Service IP address (configured in the Eip object) and add the domain name information to the
etc/hostsfile:192.168.0.100 demo.com -
On the client machine, run the
curl demo.com/pathcommand for multiple times to access the application Service.If grayscale release functions properly, only v2 can be accessed.
-
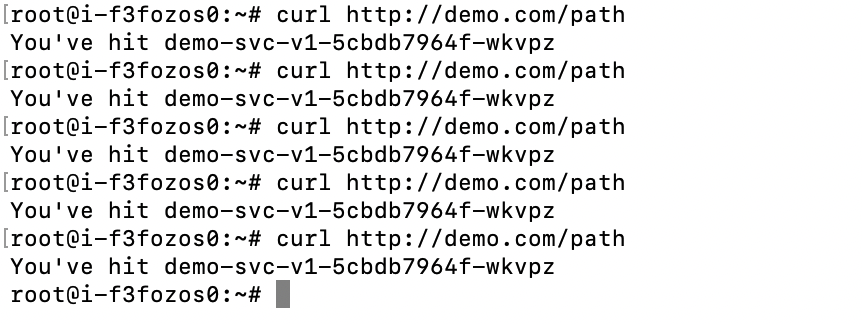
On KubeSphere, repeat step 2 so that 100% traffic is sent to v1.
-
On the client machine, run the
curl demo.com/pathcommand for multiple times to access the application Service.If grayscale release functions properly, only v1 can be accessed.
-
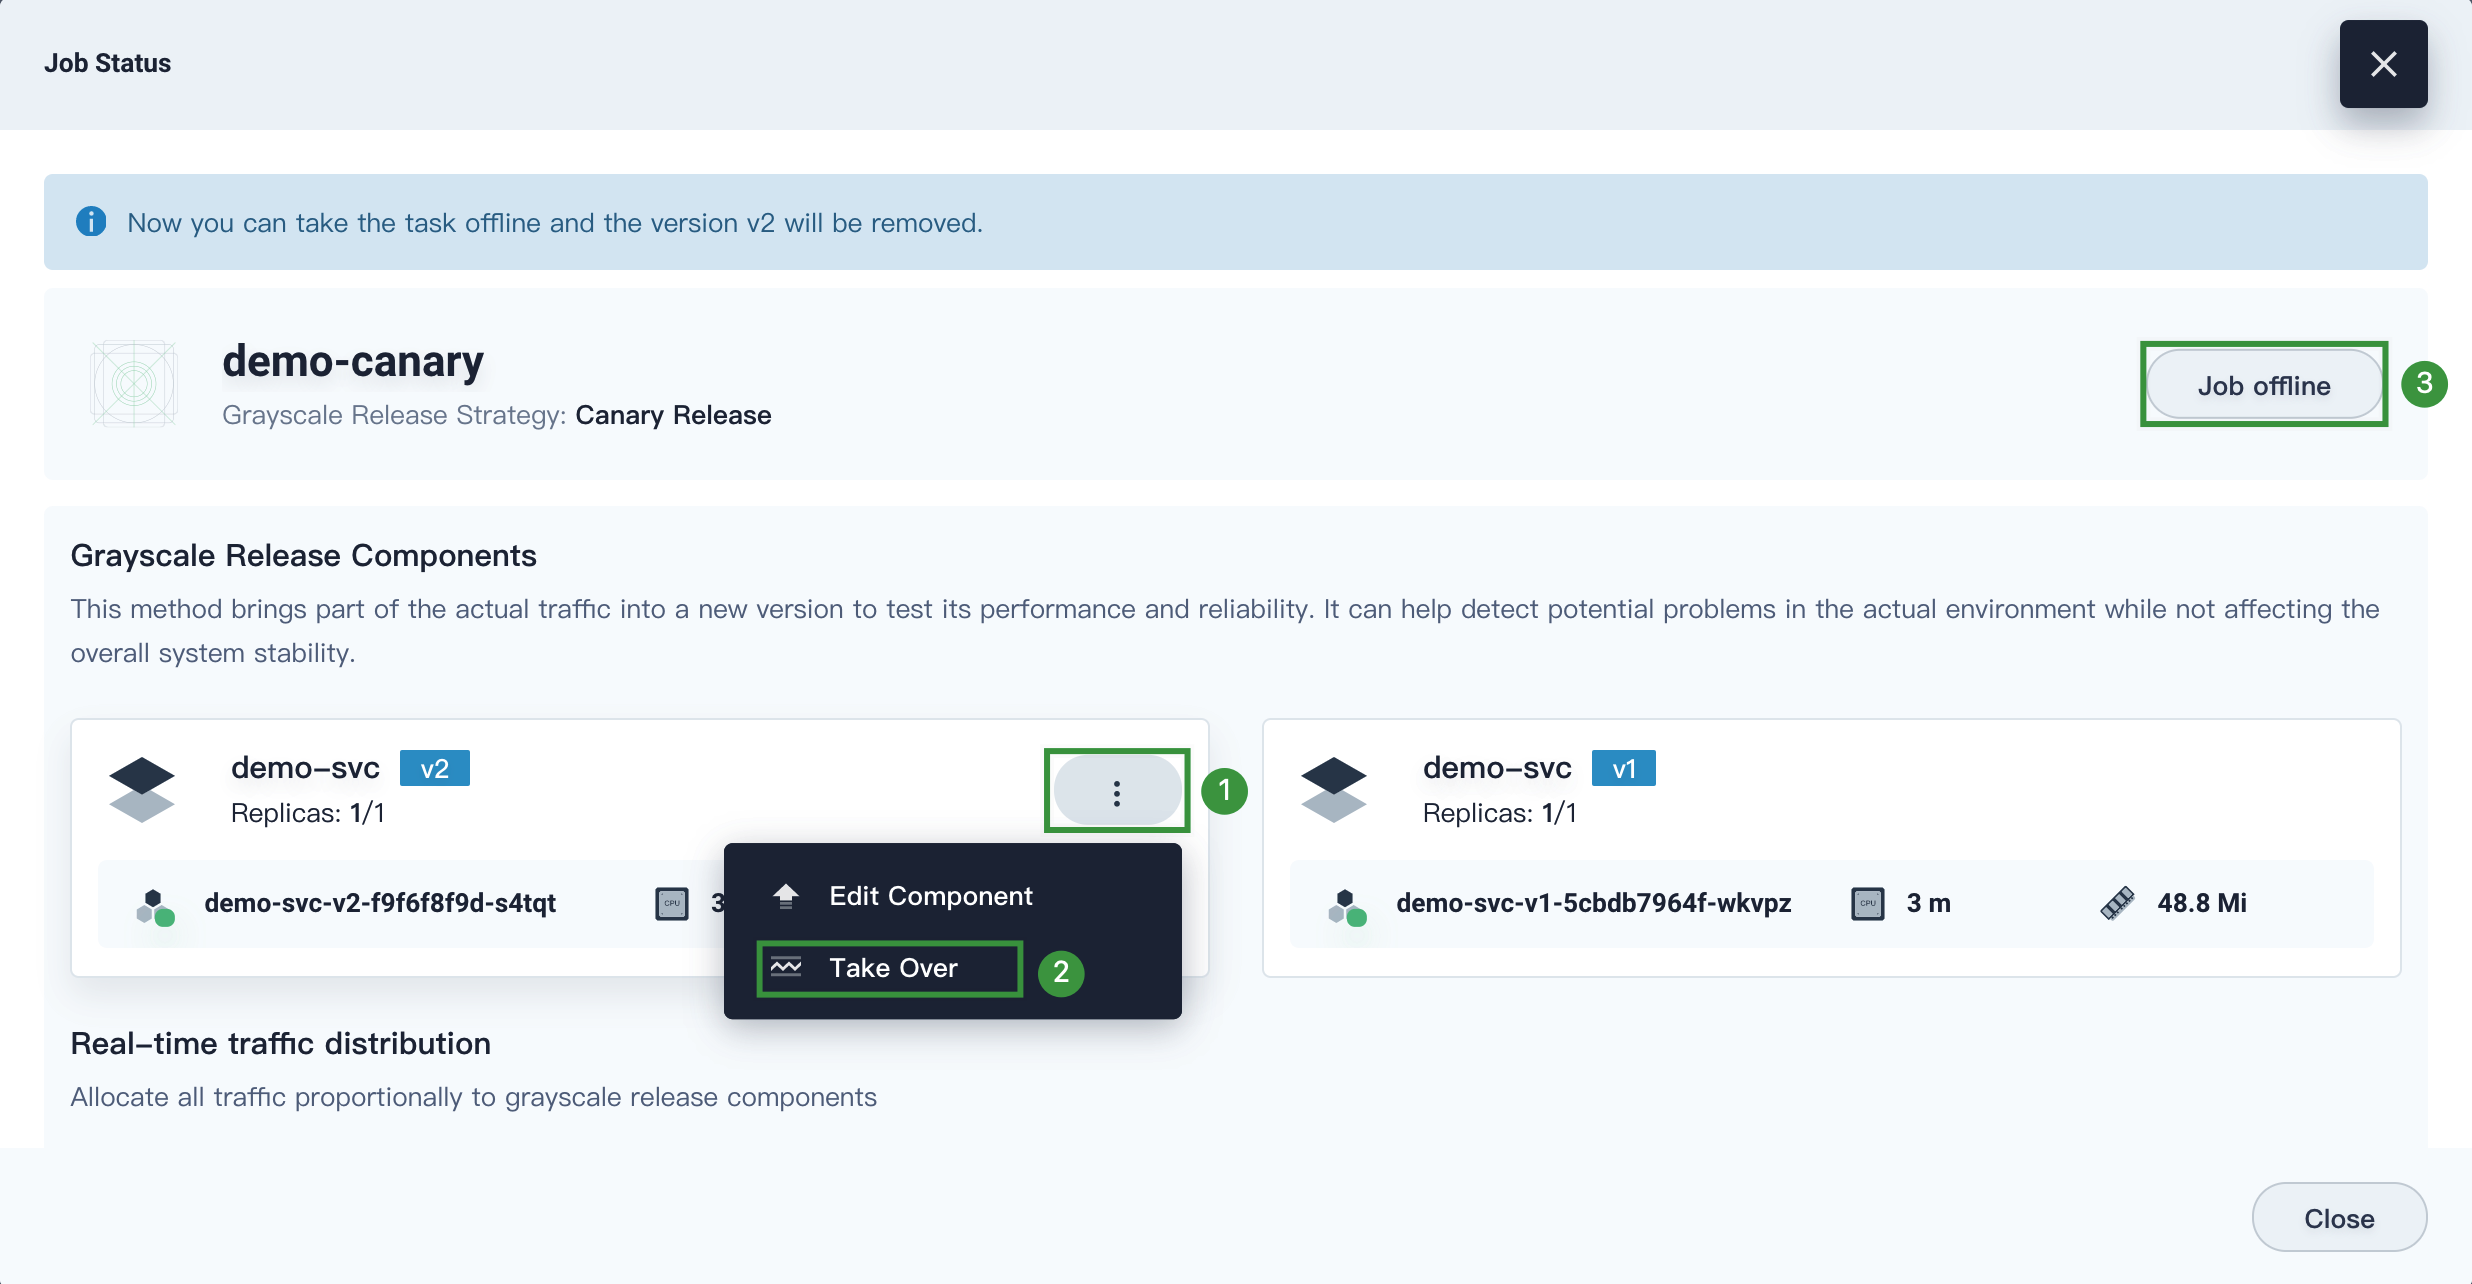
After v2 is fully tested, you can set v2 to take over all traffic and take the canary release job offline to formally release v2.